PVE 独显直通功耗优化

及时关闭Windows VS 保持Windows待机?

答案是保持Windows 待机。

关闭 Windows 虚拟机并不会使真实硬件断电,因此显卡仍会保持通电运行状态。由于显卡已经直通给了 Windows,PVE host 已经失去了对显卡的控制权。

这会导致显卡缺乏有效的软件控制,可能一直处于高负荷运转状态,反而造成更高的功耗和更大的噪音。

但是众所周知,Windows的待机功耗不尽如人意,有没有一种可以关闭Windows但不让核显失控的方式呢?

备用系统

我们可以创建一个尽可能精简和低功耗的系统,当Windows关闭之后来以最低成本接管显卡。

我选择创建一个Archlinux VM,可以根据我的需求高度自定义,比如不用compositor,display manager和DE/WM只需要tty。如果觉得麻烦也可以直接安装Debian系统(alpine 因为使用musl缘故无法安装NVIDIA官方驱动)

PVE 独显直通windows

Grub配置

参考 PVE 集成显卡直通飞牛OS

安装windows并启用远程登陆

首先我们使用默认显卡来安装windows (这样我们可以通过PVE console来查看当前画面) 安装过程可以参考 [1]

开机加载vfiomodule

编辑/etc/modules,加入以下內容

vfio
vfio_iommu_type1
vfio_pci

也许在其他教程中还会多加一个vfio_virqfd,不过在 kernel6.2 之后这个模块不再需要添加了,已经包含在vfio中了

编辑完成后使用update-initramfs -u -k all来更新 initramfs

PVE 集成显卡直通飞牛OS

更新Grub

编辑 /etc/default/grub

GRUB_CMDLINE_LINUX_DEFAULT="quiet iommu=pt initcall_blacklist=sysfb_init pcie_acs_override=downstream,multifunction"

💡 pve内核经常更新,amd_iommu=on有的内核已经内置,因此不需要上面加amd_iommu=on。如果遇到更新pve内核后,提示iommu没有开启,请手动在以上此处添加amd_iommu=on,并update-grub重启后即可解决。

  1. iommu=pt : 仅对直通设备启用IOMMU,减少性能开销
  2. initcall_blacklist=sysfb_init :启动时运行黑名单内添加项,在Intel的机型中,此项非必要添加,但是在amd机型中建议添加,否则会影响核显直通后的性能,比如4K60Hz降低到30Hz。 防止宿主机占用显卡帧缓冲区
  3. pcie_acs_override=downstream,multifunction 解决某些PCIe设备的ACS限制问题,避免死机

编辑 /etc/modprobe.d/pve-blacklist.conf

blacklist nvidiafb
blacklist amdgpu
options vfio_iommu_type1 allow_unsafe_interrupts=1

解释:屏蔽amd显卡驱动, options vfio_iommu_type1 allow_unsafe_interrupts=1 允许不安全的设备中断,在部分机型上不加此项会导致虚拟机启动加载转圈时直接宿主PVE卡死。

Delegate Azure domains to Cloudflare

Background

These days, I bought a domain (right one of this site) in Azure. I successfully assocciated this domain to my tiny site. After knowning that cloudflare offers free CDN and other advanced functions for free, so I decided to move the DNS host from default Azure to Cloudflare.

I thought it would be easy, after all I own the domain as I paid for it, However, Azure takes me aback, there is no option to transfer the authoritative DNS servers(nameservers) to outside.

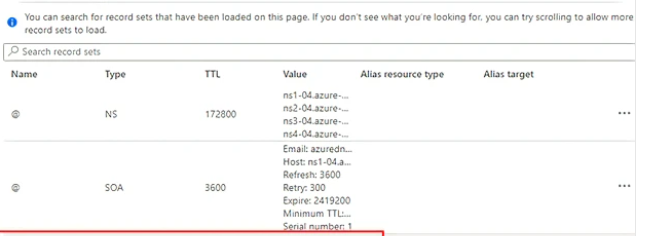
Azure will automatically create a corresponding Azure DNS Zone after the doamin registered. Despite I can add or delete DNS records on it, there is no way to delete or replace the azure's existing NS and SOA records at apex level, as the doc, which unfortunately, is a must have when transfering DNS authority.

picture 3

Fortunately, the door was not fully locked, I finally made a way out.

ZJU校园网Openwrt路由器设置

Why

学校这边上网每次都要输入账号,有登陆设备数量限制,玉泉这边还要申请静态IP地址,每人只能申请两个,申请下来还需要隔天才能生效……真的是有多不方便就多不方便。不过还好,学校的上网协议是标准的L2TP VPN认证,这几天想着把压箱底的小米路由器mini拿出来试一试看看能不能的openwrt上拨VPN然后分享出来。

刷机

Warning

刷机有变砖的风险,最好先刷入breed 或 uboot做一层保护

今日头条笔试解题报告(10.17)

之前随便投了一下今日头条竟然过了,虽然不是很想去,但是已经给了我笔试邀约好歹也就做一下,锻炼锻炼脑子,说句实话还是挺喜欢头条的题目的,做起来很有以前ACM刷题的感觉,不像其他公司总感觉"工程化"比较多。

推箱子

第一题比较简单,表面上无从下手但是仔细想想应该能想出来的,本质上跟走迷宫问题本质上是一致的,只不过在这题中状态既要保存人的位置也要保存箱子的位置。暴力搜索能够,AC代码:

Hugo使用笔记

Hugo是spf13大神写的一个静态博客生成器,拥有仅次于Hexo的用户量。相比于Hexo,Hugo使用Go编写,生成速度快了很多。除此之外,Hugo的设计更加合理,文档也比较详尽,比较适合我这种喜欢从零开始折腾的技术宅。本博客就是在hugo上搭建的,使用了自己编写的主题: canoe

迁徙博文

因为我以前使用的hexo,已经拥有相当一部分博文了,所以我需要将原来hexo格式的博文转换到hugo中。其中主要的差异在于front matter,hexo使用YAML格式,这也是支持最为广泛的格式。hugo则默认是toml,但是同时可以支持yaml和json格式。个人感觉toml格式并没有多大的方便,倒是YAML格式支持的最为广泛,所以我还是在hugo中指定了使用YAML格式的front matter:

metaDataFormat = "yaml"

Polymer 2.0 文档笔记(7) Helper Element

Polymer提供一系列的自定义元素来简化一些共有的数据绑定逻辑:

  • dom-repeat 遍历显示数组
  • array-selector 数组选择器
  • dom-if 条件显示
  • dom-bind 自动绑定

2.0 tip. The data binding helper elements are bundled in to the backward-compatible, polymer.html import. If you aren't using the legacy import, you'll need to import the helper elements you're using.

为了向前兼容,polymer.html引入了所有的helper元素,而2.0的polymer.Element则要按照需要一个个手动引入。

Polymer 2.0 文档笔记(6) Data Binding

A data binding connects data from a custom element (the host element) to a property or attribute of an element in its local DOM (the child or target element). The host element data can be a property or sub-property represented by a data path, or data generated based on one or more paths.

数据绑定能够将host元素和target元素的property或者attribute相互链接床单。这里数据指的是路径(Paths)

Anatomy of a data binding

数据绑定有两种绑定方式:

<custom-element property-name=annotation-or-compound-binding ></custom-element>
<custom-element attribute-name$=annotation-or-compound-binding></custom-element>
  1. =绑定property,$=绑定attribute(href,style,...)
  2. annotation代表数据绑定标记: [](<#>)或者\{\{ \}\}
  3. compound-binding:包含标记的字符串: "my name is {{ name }}"

Bind to a target property

将target元素的name属性绑定到当前元素的my-Name属性。 注意驼峰式和dash式命名的转换规则(property name to attribute name mapping)

<target-element name="{{myName}}"></target-element>

Bind to text content

相当于绑定到target元素的textContent属性上

<dom-module id="user-view">
  <template>
    <div>[[name]]</div>
  </template>

  <script>
    class UserView extends Polymer.Element {
      static get is() {return 'user-view'}
      static get properties() {
        return {
          name: String
        }
      }
    }

    customElements.define(UserView.is, UserView);
  </script>
</dom-module>

<!-- usage -->
<user-view name="Samuel"></user-view>

Binding to text content is always one-way, host-to-target.

注意,文字节点的绑定永远都是单向的(host to target)

Bind to a target attribute

attribute绑定相当于

element.setAttribute(attr,value)
property绑定相当于

element.property = 'value'

因此,一些attribute同样可以使用property形式绑定:

<template>
  <!-- Attribute binding -->
  <my-element selected$="[[value]]"></my-element>
  <!-- results in <my-element>.setAttribute('selected', this.value); -->

  <!-- Property binding -->
  <my-element selected="{{value}}"></my-element>
  <!-- results in <my-element>.selected = this.value; -->
</template>
需要注意的是: attribute形式的数据绑定只能是单向的([](<#>))

Native properties that don't support property binding

There are a handful of common native element properties that Polymer can't data-bind to directly, because the binding causes issues on one or more browsers.

一些原生的property无法使用=绑定数据,需要使用attribute形式的$=才能成功绑定。

Attribute Property Notes
class classList, className Maps to two properties with different formats.
style style By specification, style is considered a read-only reference to a CSSStyleDeclaration object.
href href
for htmlFor
data-* dataset Custom data attributes (attribute names starting with data-) are stored on the dataset property.
value value Only for <input type="number">.

data binding to the value property doesn't work on IE for numeric input types. For this specific case, you can use one-way attribute binding to set the value of a numeric input. Or use another element such as iron-input or paper-input that handles two-way binding correctly.

<!-- class -->
<div class$="[[foo]]"></div>

<!-- style -->
<div style$="[[background]]"></div>

<!-- href -->
<a href$="[[url]]">

<!-- label for -->
<label for$="[[bar]]"></label>

<!-- dataset -->
<div data-bar$="[[baz]]"></div>

<!-- ARIA -->
<button aria-label$="[[buttonLabel]]"></button>

Logical not operator

可以在data-binding表达式前面添加!号取反

<template>
  <my-page show-login="[[!isLoggedIn]]"></my-page>
</template>
注意:

  1. 逻辑非只能用在单项绑定中使用
  2. 只能有一个!不能!!

Computed bindings

computed binding类似于computed property。

<div>[[_formatName(first, last, title)]]</div>

An element can have multiple computed bindings in its template that refer to the same computing function. 一个元素里面可以有多个使用同样的computing function的computed binding

computed binding并不完全等同于computed property,差异有下面几点:

  • computed binding的依赖路径是相对于元素当前的data scope的
  • computed binding的参数不仅可以有computed property那样的路径参数,也可以是单纯的字符串或者数字等
  • computed binding可以没有参数,这种情况下,函数只会被调用一次
  • computed binding函数要等所有的参数中的依赖全部初始化(!=undefined)之后才会执行
<dom-module id="x-custom">

  <template>
    My name is <span>[[_formatName(first, last)]]</span>
  </template>

  <script>
    class XCustom extends Polymer.Element {
      static get is() {return 'x-custom'}
      static get properties() {
        return {
          first: String,
          last: String
        }
      }
      _formatName(first, last) {
        return `${last}, ${first}`
      }

    }

    customElements.define(XCustom.is, XCustom);
  </script>

</dom-module>

Commas in literal strings: Any comma occurring in a string literal must be escaped using a backslash (\).

如果参数是字符串,那么字符串里面所有的逗号都要被转义

<dom-module id="x-custom">
  <template>
    <span>{{translate('Hello\, nice to meet you', first, last)}}</span>
  </template>
</dom-module>

Computed bindings are one-way. A computed binding is always one-way, host-to-target.

computed binding只能在单向绑定中使用

Compound bindings

可以在字符串里面或者textContent里面使用绑定标记

<img src$="https://www.example.com/profiles/[[userId]].jpg">

<span>Name: [[lastname]], [[firstname]]</span>
注意:

  1. undefined会输出成空字符串
  2. Compound binding永远是单向绑定,虽然你也可以使用\{\{ \}\}记号。

Binding to array items

To keep annotation parsing simple, Polymer doesn't provide a way to bind directly to an array item.

为了解析简单,Polymer无法直接绑定一个数组里面的元素

<!-- Don't do this! -->
<span>{{array[0]}}</span>
<!-- Or this! -->
<span>{{array.0}}</span>

有下面几种方法可以解决: - dom-repeat里面已经为每个数组里面的元素创建了一个子scope,因此可以直接binding - array-selector 同上,可以直接绑定一个元素或者被选择的元素集合 - 使用computed binding来间接绑定,见下面例子

<dom-module id="x-custom">

  <template>
    <div>[[arrayItem(myArray.*, 0, 'name')]]</div>
    <div>[[arrayItem(myArray.*, 1, 'name')]]</div>
  </template>

  <script>

    class XCustom extends Polymer.Element {

      static get is() {return 'x-custom'}

      static get properties() {
        return {
          myArray: {
            type: Array,
            value: [{ name: 'Bob' }, { name: 'Doug' }]
          }
        }
      }

      // first argument is the change record for the array change,
      // change.base is the array specified in the binding
      arrayItem(change, index, path) {
        // this.get(path, root) returns a value for a path
        // relative to a root object.
        return this.get(path, change.base[index]);
      },

      ready() {
        super.ready();
        // mutate the array
        this.unshift('myArray', { name: 'Susan' });
        // change a subproperty
        this.set('myArray.1.name', 'Rupert');
      }
    }

    customElements.define(XCustom.is, XCustom);
  </script>

</dom-module>

Two-way binding to a non-Polymer element

为了达到非Polymer元素上面的双向绑定,可以使用下面的标记:

target-prop="{{hostProp::target-change-event}}"
<!-- Listens for `input` event and sets hostValue to <input>.value -->
<input value="{{hostValue::input}}">

<!-- Listens for `change` event and sets hostChecked to <input>.checked -->
<input type="checkbox" checked="{{hostChecked::change}}">

<!-- Listens for `timeupdate ` event and sets hostTime to <video>.currentTime -->
<video url="..." current-time="{{hostTime::timeupdate}}">
基于约定大于配置的原理,如果target-prop的变化通知函数是target-prop-changed则该定义可以省略。

<!-- Listens for `value-changed` event -->
<my-element value="{{hostValue::value-changed}}">

<!-- Listens for `value-changed` event using Polymer convention by default -->
<my-element value="{{hostValue}}">